
Windows Settings
Windows Real-time Optimization
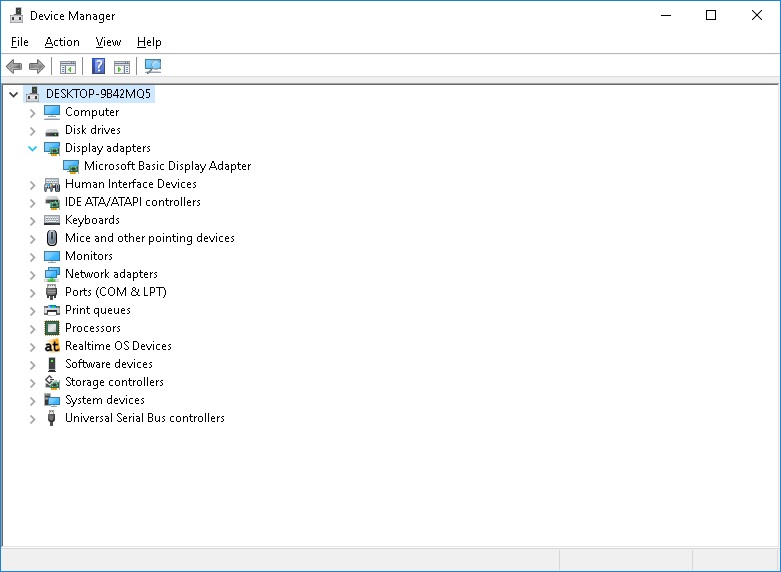
Microsoft Basic Display Adapter Driver
- Exchange the original display driver by the default Windows driver
Power Options Settings
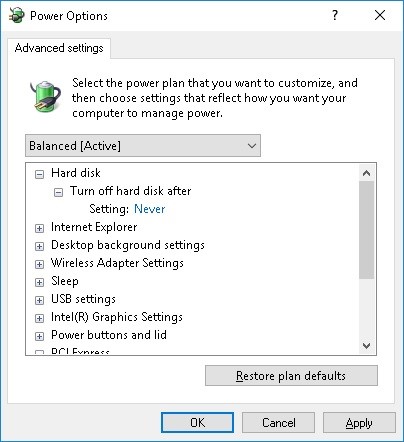
- Set "Turn off hard disk after" to "Never"
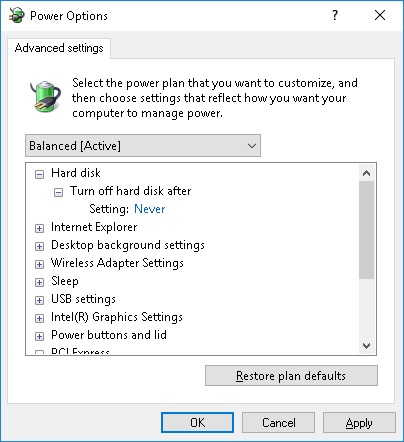
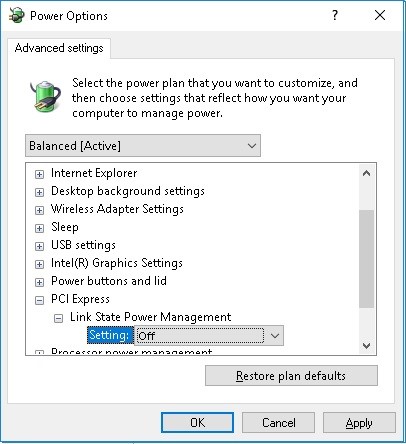
- Deactivate link state power management under PCI Express

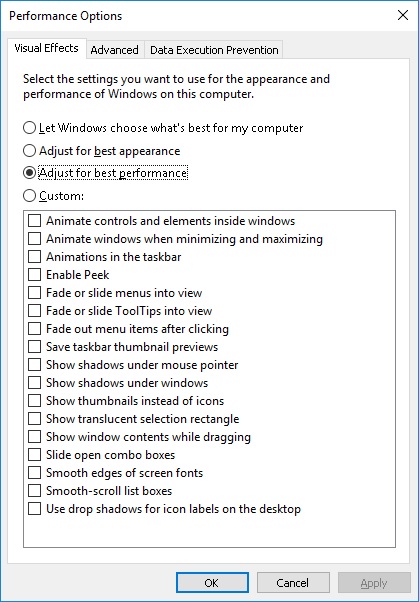
Performance Options Settings
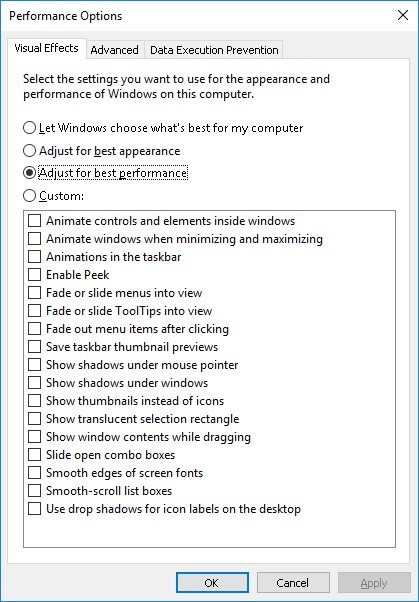
- Set visual effects to "Adjust for best performance"
- Disable all unused Windows Services
Run Batch File
- Run win10opt.bat from the download link below to remove various unnecessary items
- https://public.acontis.com/documents/Realtime/win10opt.bat
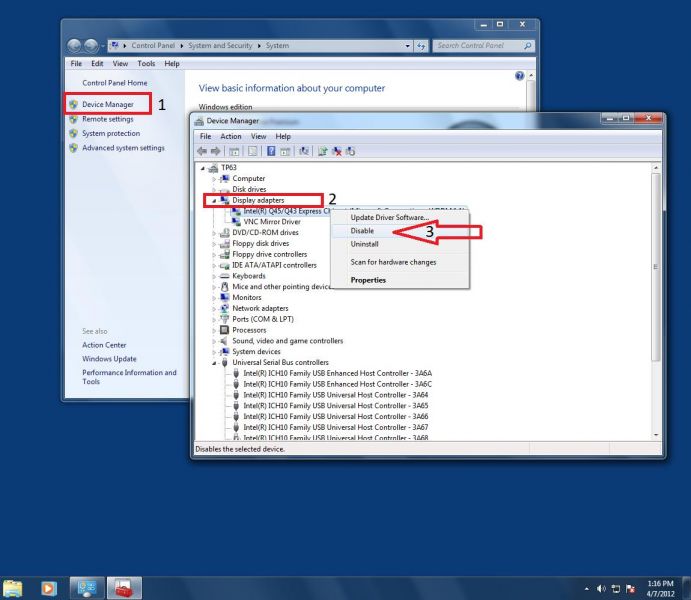
Use Windows Standard Graphics Driver
A very common cause for PC hardware real-time violation is the graphics driver.
Either disable 3D Graphics Acceleration (depending on the Graphics driver it may not be possible to disable, no screenshot herein) and/or use the Windows standard graphics driver by disabling the optimized driver as shown here.
Sandy Bridge Information
Sandy-Bridge chipsets (e.g: QM67 Express):
-----------------------------------------------------------------
The Intel Sandy-Bridge chipset contains a bug.
The BIOS typically introduced a workaround that claims two physical memory areas are not available. If this workaround is active, the following memory areas in "HKEY_LOCAL_MACHINE\HARDWARE\RESOURCEMAP\System Resources\Loader Reserved" and "HKEY_LOCAL_MACHINE\HARDWARE\RESOURCEMAP\System Resources\Reserved" are visible:
- Start 512MB, Length 2MB
- Start 1024MB, Length 2MB
As a consequence, these areas cannot be used by the real-time part (e.g. at the base address 64MB a maximum of 448MB (=512MB-64MB) can be used.
Example: Adjustment of the VxWin Memory Settings
The base address of the real-time part has to be set to 1028 MByte (behind the Sandy Bridge Memory hole). How to configure the memory of the Windows part of VxWin is described in the RtosVM-UserManual.pdf. For example in section 4.3.
The following parameters shall be adjusted: RteMemoryStartAddress and MemoryStartAddress should be identical (1028 MB = dword:40400000) RteMemorySize should be at least the same as MemorySize. It depends on the customer's requirements.
The VxWorks image has to be linked to the same address.
The VxWin BSP has to be adjusted accordingly:
Makefile:
RAM_LOW_ADRS = 40400000
Config.h:
#define LOCAL_MEM_LOCAL_ADRS 0x40400000 /* VxWorks memory base */
#define RAM_LOW_ADRS 0x40408000 /* VxWorks image entry point */
If Wind River Workbench is used, the settings also have to be adjusted (LOCAL_MEM_LOCAL_ADRS, RAM_LOW_ADRS).
Powersettings
First, all windows updates must be installed.
Apply acontis real-time optimization settings for Windows 10:
- Configuration Powerplan (Energy Settings)
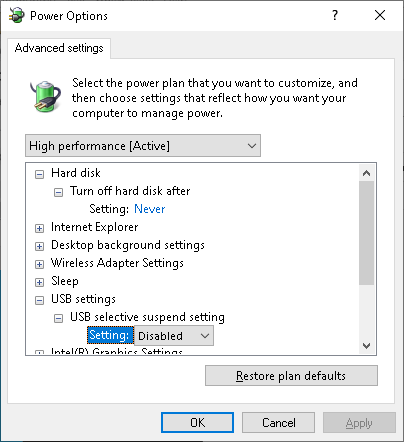
- Select High Performance (not Balanced!)
- never turn off harddisk
- Disable USB selective suspend settings
- Intel® Graphics Settings – Maximum Battery Life
- Powermanagement PCI Express deactivated
- Turn off visual effects for maximum performance (Control Panel - System – Advanced system settings – Performance settings
- Run the following commands (with Administrator rights)
REM Finalize Windows 10 IoT

REM Delete Windows update tasks

Schtasks.exe /Delete /TN "Microsoft\Windows\WindowsUpdate\Automatic App Update" /F

Schtasks.exe /Delete /TN "Microsoft\Windows\WindowsUpdate\Scheduled Start" /F

Schtasks.exe /Delete /TN "Microsoft\Windows\WindowsUpdate\sih" /F

Schtasks.exe /Delete /TN "Microsoft\Windows\WindowsUpdate\sihboot" /F


REM Delete Defrag task

Schtasks.exe /Delete /TN "Microsoft\Windows\Defrag\ScheduledDefrag" /F


REM Delete Power Efficiency Diagnostics task

Schtasks.exe /Delete /TN "Microsoft\Windows\Power Efficiency
 Diagnostics\AnalyzeSystem" /F


REM Remove XBox

Schtasks.exe /Delete /TN "Microsoft\XblGameSave\XblGameSaveTask" /F

Schtasks.exe /Delete /TN "Microsoft\XblGameSave\XblGameSaveTaskLogon" /F

Schtasks.exe /Delete /TN "Microsoft\XblGameSave" /F

sc.exe config XblAuthManager start= disabled

sc.exe config XblGameSave start= disabled

sc.exe config XboxNetApiSvc start= disabled


REM Disable Program Compatibility Service

sc.exe config PcaSvc start= disabled - Disable ASPM
On the 12th and 13th gen computers access to PCI may be delayed due to the PCI Express Active State Power Management (ASPM). On the 12th gen system, it may be possible to disable it from the UEFI setup (screenshot attached). On the 13th gen systems with a simpler UEFI setup it may not. In that case, it is possible to disable it from Linux, following these instructions: https://wireless.wiki.kernel.org/en/users/documentation/aspm, in the "Enabling ASPM with setpci" section.
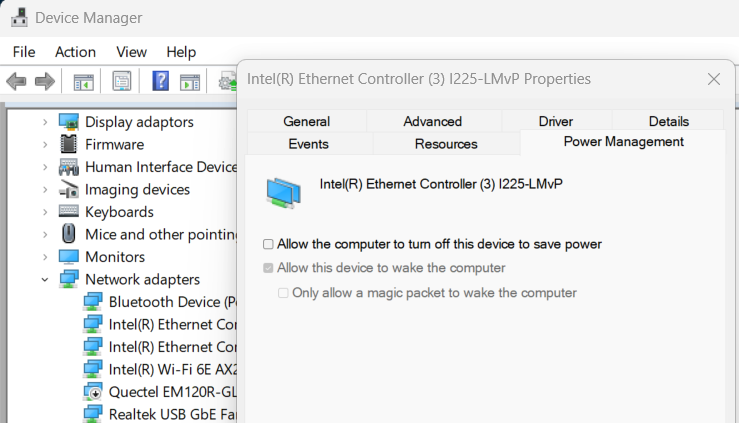
Device Power Management
- Open the device manager
- Open properties of a device
- Select "Power Management" Tab
- Untick the option: Allow the computer to turn off this device to save power
Core Parking
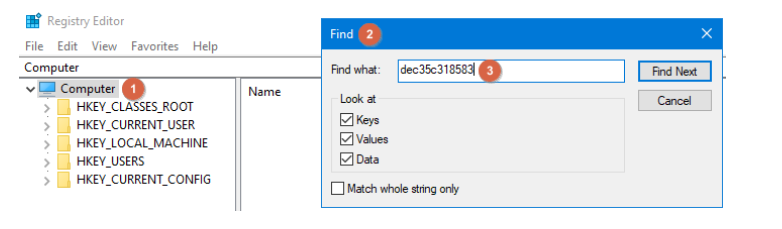
The core parking feature enables to shut down CPU cores to save power. Normally, this feature should be disabled in Windows 10 and Windows 11 high performance power plans by default. To unhide and check this setting, the registry editor is needed.
- Press Win key + R to open run dialog, type "regedit" and click "Ok"
- Click on Computer (1), open the Find dialog (2) by pressing CTRL+F, and type in dec35c318583 (3). Click on the Find Next button to start searching
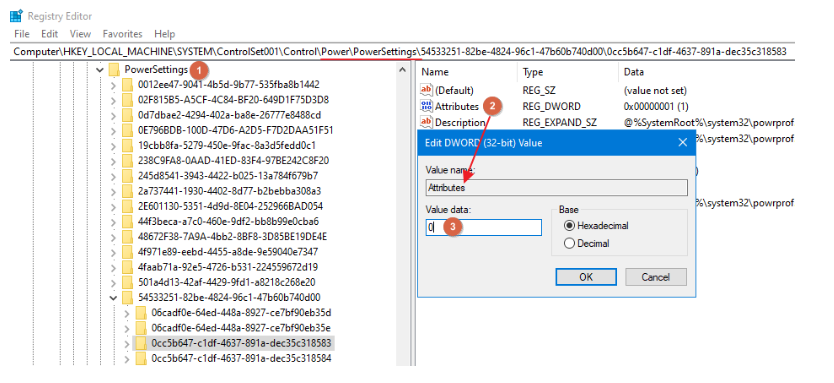
- Make sure search results are related to PowerSettings (1)
- Double click on the Attributes value (2), and type in 0 as the Value data paremeter (3)
- Repeat the search with F3 key, because there might be more entries related to PowerSettings and set the Attributes value data to 0
- Open power plan
- Navigate to the now visible setting "Processor performance core parking min cores"
- Make sure it is set to 100%
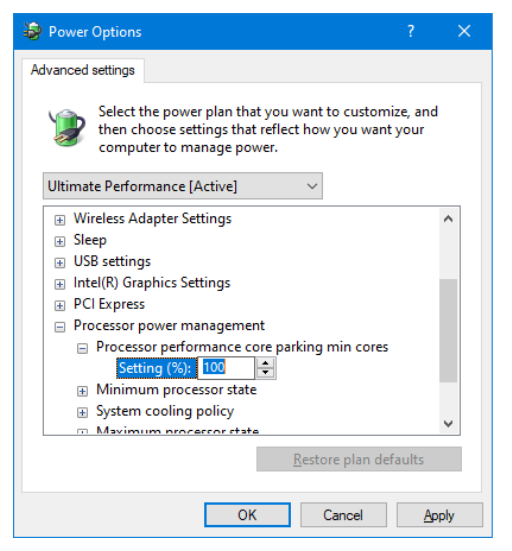
Core parking should now be disabled. This prevent delays when Windows is parking and unparking cores.